One of my son's Brunswick High School Rugby team mates recently lost his life in an auto accident along with 3 other Brunswick teens. My son's team mate, Kevin Fox, was an organ donor and helped save 8 people through his donation. I will be participating in Lifebanc's 2012 Walk for Life with "Team Fox" in August in honor of this incredible young man. If you would like to donate, please click on the "I support a worthy cause" link above. Thank you.
http://fox8.com/2012/06/09/brunswick-teens-family-give-emotional-tributes-at-funeral/

Sunday, June 10, 2012
Saturday, February 25, 2012
My Apologies and Gratitude
Thank you to all who continue to visit this blog. It has been a busy year for me and I apologize for the lack of posts. In the upcoming months, I will try to get online more frequently and continue to post my research finds, and experimentation results. Again, thank you to all who have supported this blog. I have been overwhelmed by and thankful for the number of visitors in the past months.
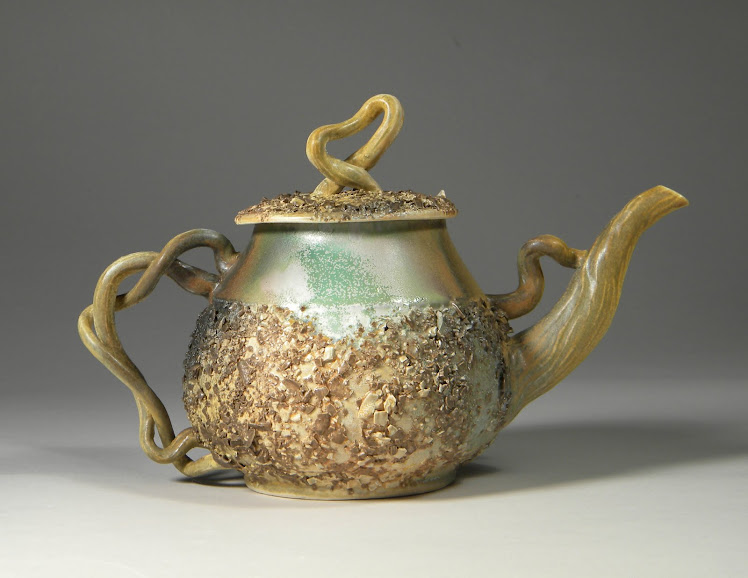
Using an Iron Oxide Wash
I have received a few comments about the iron oxide wash recipe that I had posted earlier. Typically, when I've used this wash, I had painted it on green ware prior to the bisque firing concentrating on those areas that I wanted to appear darker. Most recently, I used the wash on a series of magnets that I had done for wedding shower favors. The magnets were small cookie cutter hearts with impressed scroll designs. I painted the wash into the impressed areas and, while wearing a mask, lightly sanded the areas in which I did not want the darker colorant. I had used a beautiful speckled cone six clay and preferred not glazing on top of the wash.
I have also used this wash in the past on green ware, bisque fired, and then glazed on top. The areas with the wash appeared darker where the iron oxide had bled through, however, this this technique may not be used with all washes as different colorants and glazes may act differently when glaze is applied over the wash.
Of course there are other ways to use washes. Here's some links that may help:
An article on using oxides on the Big Ceramic Store website and another on the Glendale College website,
http://www.bigceramicstore.com/information/tip12.htm
http://seco.glendale.edu/~rkibler/oxidepainting.html
Oxide wash recipes on Potters.org
http://www.potters.org/subject06350.htm/
Thursday, April 14, 2011
Thank you Claystation
Thank you Claystation for listing Marusa Ceramics and Pottery Blog as one of the top 30 ceramic blogs! I am flattered and grateful!
Another Great Article from Ceramic Arts Daily
I've mentioned in the past that it can be very challenging to achieve glaze interest when firing to cone 6 in oxidation. Ceramics Arts Daily's featured article today was by glaze expert John Britt. John was generous enough to share some of his hare's fur and oil spot glazes in the article and the pictures are absolutely stunning. He achieves the beauty of his cone 6 recipes by layering two glazes.
Layering glazes is often employed by ceramic artists who fire in this range and atmosphere and it's great to try different glazes in the process. Of course some combinations work and others don't so always use test tiles or larger pieces that didn't fair well in the bisque firing to experiment with new glaze combinations. I like using the larger pieces to get a good feel for how the glazes will react on different textures and will often throw small cups or bowls for this purpose. Anyway, here is the link for John Britt's article on Ceramic Arts Daily
Wednesday, March 2, 2011
An Insightful Film Addressing the Challenges of Female Artists
Here's a link to the trailer and website for a film that I hope to see in the near future: "Who Does She Think She Is"
Tuesday, February 22, 2011
Experimenting with Different Styles
I really enjoyed reading today's featured article from Ceramic Arts Daily. It is an interview with an established artist who seems to have abruptly changed his style. Here's the link: Ceramic Arts Daily's Interview with Nick Joerling
I agree that it's important to keep experimenting in the studio. One's medium should be considered one's voice or possibly one's "vocabulary" as one of my former professors, Dave Williamson, would say. It always helps to consider a message or viewpoint to convey in your work and then ask yourself how you could communicate that using your "vocabulary."
Another thing to consider when designing new work is a quote that I read several years ago made by a ceramics professor who would challenge her students by telling them "Show me a pot that I've never seen before." Unfortunately, I can not remember that professor's name. If anyone else is familiar with the quote, please let me know the name of the author so that I may give them proper credit.
Wednesday, January 26, 2011
Cone 6 Wine Red Glaze
I promised glaze recipes earlier in this blog so here is my new favorite glaze. The recipe was first printed in Clay Times in the March/April 2005 edition by Richard Burkett. His recipe included the addition of .25 cobalt carbonate but without it, it's a beautiful wine red breaking white where thin. Thinner coats of glaze produce a mottled wine and white surface. Thicker coats produce a more solid colored wine. The glaze has not run for me and has a nice semi-gloss appearance. Slow cooling has little effect on this glaze but will change the color slightly to more of a burgundy than red. My test firing was done in oxidation and I do not know what the results would be in reduction.
32 Silica (flint)
21 Gerstley Borate
20 Calcium Carbonite (whiting)
16 Nepheline Syenite
11 EPK (kaolin)
5 Tin Dioxide
.15 Chrome Oxide (chromium green)
Tuesday, January 11, 2011
Achieving Opacity in Glazes
I made my trip to stock up on raw materials and clay yesterday and was floored by the increased price of tin! It was more than double the cost of what I paid last year. Tin is used as an opacifier in glazes and also to achieve reds and pinks in midfire glazes. Due to cost, I've decided to save my tin for chrome-red glazes and substitute other opacifiers in various glazes. I've spent the morning researching my alternatives online and in Robin Hopper's book "The Ceramic Spectrum." The following link to the site Digital Fire had a pretty good list of opacifiers and covered most of what was in Robin Hopper's book. However, Hopper also mentions that Clays and Feldspars may act as opacifiers as well. These work similar to one another as a glaze will only absorb so much clay before the remainder remains unmelted. The glazes made in this manner would have an opaque matte character and may have a dry underfired look. I prefer matte glazes achieved by the formation of small crystals formed by slow cooling. Some of the materials that aid in the process are: lithium, barium (I prefer not to use this for toxicity reasons), zinc, potassium, magnesium, sodium, and iron.
Tuesday, January 4, 2011
Glaze Simulator Website
Here's another awesome link to a free glaze simulator website. It enables you to enter your glaze ingredients when developing glazes and it will analyze those recipes for you: http://www.glazesimulator.com/
I also strongly recommend the following site if you fire to midrange cone 6: Electric Midrange Cone 6 Potters http://cone6pots.ning.com/ The following discussion is truly worthwhile no matter to what range you fire: "How to direct your pottery knowledge to a business"
Bill Van Gilder Cone 6 Glaze Recipes
Happy New Year Everyone! I apologize for not posting for awhile but it has been a busy holiday season. Here's a link to some glaze recipes that Bill Van Gilder has generously shared. I am firing a test tile of his Crocus Martis Red today. I used red iron oxide in place of crocus martis. I'll let you know how it goes. I have been searching for a good cone 6 red glaze and would be very appreciative if anyone has a good recipe and would like to share.
http://www.vangilderpottery.com/glaze/vangilder%20CONE%206%20OXIDATION.pdfUPDATE:
Well, it turned out to be a beautiful brown glaze with small reddish crystals. I've tried firing to cone 6 and then slow cooling to 1650 degrees Fahrenheit and holding for 30 minutes. I also tried re-firing to 1650 and holding for one hour. The glaze coloring remained the same for both tests. However, the slow cooled firing produced a semi gloss glaze and the re-fire produced a matte appearance. It does look beautiful with the wine red glaze though so it's definitely a keeper. I intend to pick up a Spanish red iron oxide or crocus martis at a later date and use that in place of the red iron oxide to see if it makes a difference.
Thursday, December 16, 2010
Potter at an Art Fair
Here's a humorous "YouTube" video that was recently posted by an artist friend on facebook.
Thursday, December 9, 2010
PANTONE: Find out how we forecast new color trends
Let's face it, we all want to make sales and market research is a part of that. It helps to know what's trending but, of course, there is also still a lot to be said for classic time honored design. Here is an awesome video that focuses on color trends:
Wednesday, December 1, 2010
Easy Lockerbie Power Switch Repair
I took a little more effort than usual cleaning up my Lockerbie potter's wheel a couple days ago. When I was ready to trim mugs on the wheel yesterday, I tried to turn the power on to the wheel and the power lever did nothing but flop around.


To fix the situation, I removed the cover to the power box-after disconnecting power to the wheel. To remove the cover, unscrew the two outermost screws. There is supposed to be an attachment to the power lever on the inside of the cover that looks somewhat like a pepsi can pop top. Mine was laying on the bottom of the box. The inside of the cover plate should look something like this when it is attached:

The two inner screw holes are used to attach a pretty typical looking switch, much like what is used on your walls to turn on light fixtures. The switch is meant to be inserted into the hole on the pop-top looking attachment. To reattach that piece, I put it back on the inside part of the outside lever-it somewhat resembles a four leaf clover-and used a small hammer to pound down the clover looking end over the hole in the pop top looking piece until I was sure that it would not come apart again. When reassembling, I made sure the switch found its way into the large hole on that piece, reattached the screws holding the electrical switch in place and replaced the cover back onto the electric box. I apologize for not knowing the technical terms associated with this assembly....but it now works perfectly : )
Monday, November 22, 2010
Protect Yourself
Here's a link with information on how to protect yourself from con artists when selling your work. A lot of the information is common sense but here it is: http://www.artscams.com/
Also, don't forget to protect yourself in the studio. As most ceramic artists are aware, silica in clay dust can potentially be harmful to the lungs. Here's a link that briefly describes silicosis and prevention methods:
This link provides a little more in depth description of silicosis: http://www.merckmanuals.com/professional/sec05/ch057/ch057i.html
Thursday, November 18, 2010
Another Admired Ceramist
This is a link to a Ceramist, Todd Leech, that I had the opportunity to meet while in college. I admire both the content of his work and his incredible textural surfaces.
And a very moving "You Tube" clip about Todd and his work "Drowning and Rejuvination." http://www.youtube.com/watch?v=tTRsNR3VZUI
I can relate to Todd's work featured in the video because he and my husband both received organ transplants around the same time period, however, for different reasons. Todd has perfectly captured the full spectrum of emotions that one undergoes through the deterioration of health to the hope of imagining a future in this amazing installation.
I can relate to Todd's work featured in the video because he and my husband both received organ transplants around the same time period, however, for different reasons. Todd has perfectly captured the full spectrum of emotions that one undergoes through the deterioration of health to the hope of imagining a future in this amazing installation.
Tuesday, November 16, 2010
Much Admired Ceramists
Here's a couple "You Tube" links for a potter, Steven Hill, whose work I admire:
http://www.youtube.com/watch?v=I_R5hafdS_U&NR=1
http://www.youtube.com/watch?v=uYQMJuP8r5c
I mentioned Susan and Jan Peterson's book "The Craft and Art of Clay" on an earlier post, titled "References," and recently found a 92 page + preview of that book on Google Books (click on the blue links on the table of contents page for additional pages). Here's the link: http://books.google.com/books?id=PAZR-A9Ra6EC&printsec=frontcover#v=onepage&q&f=false
One more link: This is a fantastic site that focuses on glazing at Cone 6: "Electric Cone 6, Mid-fire Potters"
http://cone6pots.ning.com/
New Links Directory Page
Please check out the new "Favorite Ceramics & Marketing Links" page that I added to this blog yesterday evening.
The link is located at the top of the right hand column. I've tried to add all of the links listed in my blog posts but will take another look to make sure that I haven't missed anything. I also welcome suggestions for other links to add to the list.
Sunday, November 14, 2010
Iron Oxide Wash
I ran across some of my college notes a few days ago and found this recipe for an Iron Oxide Wash:
1 teaspoon Iron Oxide
1 teaspoon Rutile (I've been mispronouncing this. It's pronounced roo-teel)
1 teaspoon Nepheline Syenite
2 pints water
*for black add 1 teaspoon cobalt carbonate
1 teaspoon Iron Oxide
1 teaspoon Rutile (I've been mispronouncing this. It's pronounced roo-teel)
1 teaspoon Nepheline Syenite
2 pints water
*for black add 1 teaspoon cobalt carbonate
Saturday, November 13, 2010
Guest Posting
If you would like to write a "Guest Post" and have it posted to this blog, please contact me via the email link on my profile page. I would love to have posts containing marketing tips, success stories, studio tips, instructional videos, glaze recipes, galleries that feature emerging artists, and anything else that would be helpful. I promise to post a link to your website, Etsy shop, or other sales site along with an accepted post. Hope to hear from you soon! If you would like to comment on a post, click on the post's title and you will be able to do so. I would also love to hear about topics that you would like to see me write about. No guarantees but I will certainly do my best.

Wednesday, November 10, 2010
Artist Website Tips to Increase Gallery Attention
Just found an article online that I'd like to share. It's about making your website more attractive to gallery owners. The site is called "Art Marketing Secrets"
http://artmarketingsecrets.com/2010/06/12-tips-to-grab-galleries-with-your-artist-website.html
It appears that they have a lot of other useful information but it's getting late and I have an early morning tomorrow.
http://artmarketingsecrets.com/2010/06/12-tips-to-grab-galleries-with-your-artist-website.html
It appears that they have a lot of other useful information but it's getting late and I have an early morning tomorrow.
Sunday, November 7, 2010
Marketing Stuff
I just found this terrific site called "America Creates" http://www.americacreates.com/
The site offers american artists an opportunity to sell their work. What I truly like about the site is that the artists listed are required to be juried in. It appears to be a newer site. However, there is a lot of inspiring ceramic work listed by very talented ceramists.
Best ceramics blog
Here's another site that I recently ran across called "Empty Easel." It can be found at http://emptyeasel.com/
** Just opened : http://www.americacreates.com/beverlymarusa/galleries
Best ceramics blog
Here's another site that I recently ran across called "Empty Easel." It can be found at http://emptyeasel.com/
Lots of helpful marketing information!
Also, please visit my new website at http://beverlymarusa.com I will continue to add more work through out the month.** Just opened : http://www.americacreates.com/beverlymarusa/galleries
Tuesday, November 2, 2010
My Very Talented Nephew
Please take the time to visit my talented nephew's website at:
http://ARShondrick.com
Andrew Shondrick
B.F.A. University of Akron
http://ARShondrick.com
Andrew Shondrick
B.F.A. University of Akron
Welcome Friends!
After only beginning this blog about a month and a half ago, it has been visited by the United States, Canada, Japan, India, Russia, Ukraine, Taiwan, Hungary, Israel, Germany, France, Australia, and South Africa. I am overwhelmed by the fact that it has been viewed over 140 times. Welcome to everyone! Please feel free to add comments, helpful hints, questions, or just say hello. Also, thank you so much for visiting!
And, a few more: welcome to United Kingdom, Serbia, Belgium, Italy, Bahamas, Slovenia, Brazil, Greece, Netherlands, Indonesia, Romania, Latvia, and Poland!
And, a few more: welcome to United Kingdom, Serbia, Belgium, Italy, Bahamas, Slovenia, Brazil, Greece, Netherlands, Indonesia, Romania, Latvia, and Poland!
Photographing My Work
As we all know, an artist wears many hats. Artist, marketer, business manager, public relations manager, and some (including me) photographer. It would be wonderful to be able to pay someone to take over some of these jobs. However, as an emerging artist, I do not yet have that luxury. I plan on spending most of my day photographing artwork so I can finish up the website that I've been working on. I have included photos of my photography set up. Of course, I have made it as inexpensive as possible. I'll start from the back of the set up and work forward. I have a home-made photo paper roll holder attached to the wall that was made from 2" x 8" scrap wood left over from a previous household project. Holes were drilled into the side supports to accommodate a left over piece of conduit, again from a previous household project, that now supports the paper roll.

The lights used are Smith-Vector. The bulbs are blue tinted daylight adjusted tungsten made by Eiko. 500 watt, 4800 kelvin, 110v-120v. They cost about $7.00 each. The lights are set at the same height and aimed at about 45 degree angles on each side. The use of a third light attached to a boom would be better. It would be located directly above the object being photographed and would help to reduce shadows. Here's the overall set up:


Make sure to set the white balance on the camera by putting a piece of white paper under the lights and finding the white balance manual setting on your camera. Fill the frame with just the white paper before doing so:

And here's the photographed piece. However, I believe that I will be pulling the table out a little to adjust the background shadow and adjust the lights a little lower to reduce the side shadows. Also, make sure that the room is dark when photographing by blocking out any windows and turning off lights other than those used to light your piece. It's a good idea to download that first photo before proceeding to do more pieces. It's much easier to see what adjustments need to be made on a large screen rather than the small screen on the back of the camera.

After adjusting the photo paper and lighting. Notice the reduction of side shadows from dropping the lights a little and also notice the more gradual appearance of the background shadowed area from pulling the table further from the wall and rounding out the transition from the flattened area of the paper on the table to where it attaches to the wall.

Friday, October 29, 2010
Inspiration Close to Home - Actually at Home


Earlier this week I posted inspiration photos that I had taken at a nearby park and decided to mention that it is not always necessary to travel away from home to gain inspiration. Challenge yourself, walk around your yard or through your house and find at least one thing to inspire a new piece. It could be something natural or even a commercially purchased item. Ask yourself how you can improve upon the design, how it can be incorporated into or onto a piece currently being worked on, or what it may look like if altered to become something totally different. Use a sketchbook, it doesn't have to be for every piece but it can help when designing more elaborate pieces. Often times I'll just doodle shapes in my sketch book and play with the ones that intrigue me and see what types of vessels I can turn those shapes into. These are some of the inspiration photos that I took walking around my own yard. I included a photo of my little buddy Smokey who had a lot of fun following me. Also, I do not have a large yard. It is about 1/2 an acre in a suburban town.
Monday, October 25, 2010
Inspiration


I spent the day with my camera at a local park yesterday. The autumn colors here in northern Ohio are just past their peak but still quite beautiful and I thought that I would share some of my inspiration photos. I also collected a handful of leaves which I will be incorporating into some of my new work. Some of the photos taken will be photoshopped and used to do new paintings. Although my primary focus has turned to ceramic work, I still enjoy doing paintings now and then.
Tuesday, October 19, 2010
Some of the Original Pieces
After posting some of my newer work on the blog a few days ago, I realized that I hadn't posted any of my older work. These pieces were done towards the end of 2005 and beginning of 2006 while still auditing classes at the college after graduating. They are composed of high fire stoneware with sprayed glazes and fired at cone 10 in a gas reduction atmosphere. My newest work is composed of mid fire stoneware, sprayed crystalline matte glazes, and fired to cone 6 electric. However, the challenge has been to replicate the glaze interest of the high fire reduction ware in cone 6 oxidation. I'm getting closer but still have work to do.


Monday, October 18, 2010
Powerpoint Presentation
Well, as I said previously, I am an emerging artist and would like to find gallery representation. To do so, I am currently working on a PowerPoint presentation of my work that includes a title page, artist statement, and photos of my work. I will be adding more work to it but what I have started so far may be viewed at https://docs.google.com/present/view?id=0AQnbeodaW8TeZGNxc2gzdzlfMGY4M2htZGdi&hl=en (corrected link-sorry for any inconvenience).
I have identified several galleries where I would like to have my work shown. I will copy the PowerPoint presentation to CD and include it with a short introductory letter and send it those galleries. I will let you know how it goes.
Friday, October 15, 2010


Subscribe to:
Posts (Atom)